PREFER A FREE QUOTE FOR MEASURE & INSTALL?
Please read through guides provided before proceeding with your installation.
Tools - you will need:
Cordless Drill
3 mm Drill Bit
5/32 Drill Bit
Phillips Screwdriver
Hacksaw
Pop Rivet Gun
Step 1. Sliding the door
When you install a sliding door it is important to align top rollers to the top track first. Then lift the bottom rollers up on to the bottom track. Slide back and forth to make sure that you have rollers correctly on the track; do this with both doors.
Once both doors are on the tracks, roll them back and forth and then bringing them both to the centre. Now with a Philips head screwdriver adjust the rollers located at the back of the doors. Start with the bottom rollers and adjust only enough to bring doors into a perfectly square situation with each other in the centre location. Once this is done and the doors are square, adjust the top of rollers up so as to take any up-and-down movement out of the doors. Be careful at this point not to adjust rollers too tight as it may cause them stress. Only take the up-and-down movement out.
 1.1
1.1
Step 2. Installing the H Receiver and Lock
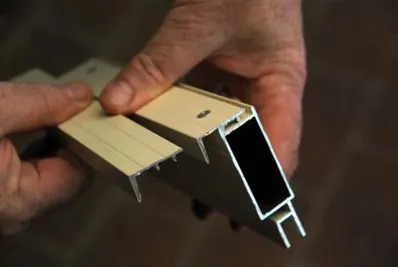
The H-Receiver is designed to be fitted to the non-active door and may need some adjustment in height. Use a hacksaw or a drop saw to get the correct height, fit to the non-active door with the rivets supplied. The channel will have two small ribs in one side of and this is to face the non-active door leaving a clean U channel for the active door to close into.
 H-Receiver
Bring the doors together in the centre and mark the required location of where the striker receiver will be installed onto the H channel. Using a 3 mm drill bit drill in the centre of the two elongated holes and attach the striker receiver with the screws provided. Close doors and adjust as necessary.
Step 3. Installing the Frame Interlock
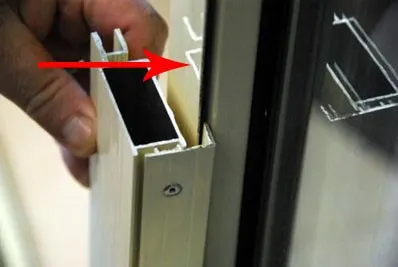
Bring the doors to the centre and allow to self catch together. Make sure the doors are centred perfectly and line up with the receiving interlocks on the fixed glass panels. There should now be approximately a 4 mm overlap; install the frame interlocks provided starting with the non-active then moving to the active. Using a 5/32-drill bit, drill and pop rivet the frame interlock with the rivets provided. In some cases it may be necessary to adjust length the of frame interlock, this can be done with a hacksaw. Once installed, open and close the doors to tests that they are locking and interlocking correctly. Test that the keys are operating both internally and externally and that the internal chrome snib is working correctly as well.
 1.5
1.5 1.6
1.6
Step 4. Installing the Receiving Interlock (if required)
For installation where a 3 mm or 7 mm receiving interlock is required follow the process as above up until the the frame interlock is to be installed.
Once you have established that your doors are locked and sliding back and forth as one complete unit, then line them up in the centre exactly. These now should be slightly overlapping the fixed glass panels by around 3-4 mm on either side.
Take a visual memory note of where these will line up, slide the two doors to the left and install the right hand side receiving interlock onto the fixed glass panel.
Once this is completed slide the doors backing to position and double check that you have installed the receiving interlock to line up correctly with the back of the door.
Slide the doors to the right and repeat the same process on the left-hand fixed glass panel; ensuring that when you bring the two doors back to the centre that the receiving interlocks do not come past the edges of the doors.
Install the receiving interlocks adjusting heights with a hacksaw as necessary.
Two small lugs are located on the inner part of the receiving interlock are designed to slide back and forth inside the back door to give you a degree of adjustment so as to align correctly.
For installation where a flat interlocks is required follow the process as above up until the the frame interlock is to be installed.
You will notice now that your doors will overlap the fixed glass panel by around 10-12 mm on either side of the fixed glass panels. Make sure the doors are closed together and are in the absolute centre.
Using a removable marker such as a text or pencil mark where the back of the door will stop in the closed position on to the glass on the behind the fixed glass panel.
Slide the two doors to the left and install the flat interlock onto the fixed glass panel making sure not to drill too close to the glass. Be very careful during this process. Your doors are made from toughened glass and if you do happen to touch them with the drill bit or a rivet you stand a very high chance of cracking or shattering the glass inside the fixed glass panel.
Once you have installed the right-hand side receiving interlocks slide the doors to the right and install the receiving interlock to the fixed glass panel on the left-hand side. Once this is completed bring the doors back to the centre to check alignment and then install the frame interlocks
Open and test doors to make sure that they are locking and interlocking correct. Test also that the keys are operating both internally and externally and that the internal chrome Snib is functioning correctly.
 1.1
1.1 H-Receiver
 1.5
1.5 1.6
1.6